The ultimate Electron guide


You have just taken the next step to invest in yourself and your skills by reading this guide! In this post, we will be taking a deep dive into the Electron JS ("Electron") framework, learning how everything works and how it was designed to fit together. We will build our knowledge incrementally, so by the end of the post, you will have a clear understanding of the Electron framework and be able to use this new knowledge with your creativity to build the app you have been dreaming of. Let's begin!
The 10,000ft view
Native desktop apps require specialized knowledge per platform in order to develop them. To write a desktop app on Windows would likely use WPF. To write a desktop app on Mac requires knowledge of the Cocoa framework. To write a desktop app on Linux might leverage Gtk or GNOME. You might choose to write an app in a platform-specific language if you want to:
- Provide a low memory footprint for your app
- Provide users with a very fast and responsive app
- Support a client who does not need cross-platform support
In today's world, memory is cheap and time is expensive. Nine times out of ten it is better to be first to market than to come in second. This environment we live in has created incentives to prioritize portability over performance if we want our app to succeed in this highly competitive space; this is where Electron comes in.
Electron leverages common languages, Javscript, HTML and CSS, in order for you to quickly scaffold and refine your app for cross-platform use.
How does Electron support multiple platforms?
The Electron framework bundles Chromium, the open source, cross-platform browser and Node into one framework. Chromium is what renders the screens/windows of your Electron app, while Node provides OS-level functionality (think file access, database access, etc.) for your application.
Since Electron uses Chromium, we have cross-platform support: every operating system will use the same bundled version of Chromium. This feature is one benefit Electron has over Tauri (another cross-platform framework) - your app will look and behave exactly the same on any supported operating system.
How do Chromium and Node interact with each other?
Before we are able to explain how Chromium and Node interact within the Electron framework, we will first review the project structure of an Electron application. We will then discuss various dependencies an Electron application may have, along with the version of Electron, and how that changes how Chromium and Node interact with each other in the Electron framework.
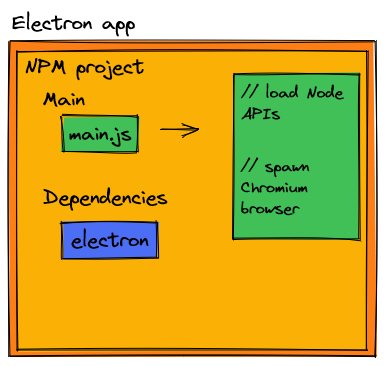
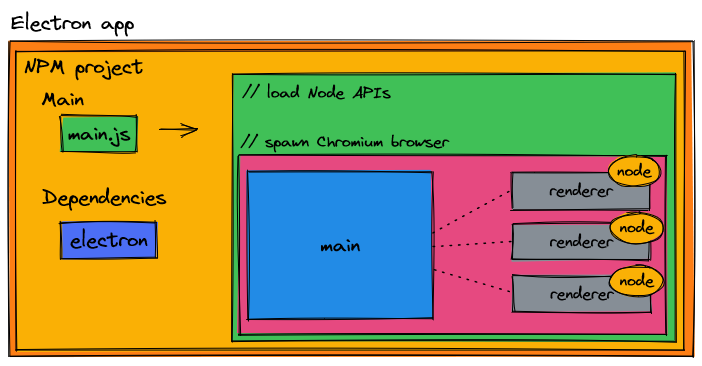
An Electron app is a npm project that includes the electron framework as a dependency. The main entry point of the npm project is the entry point of an Electron app where we optionally include any Node APIs we desire, as well as create the browser that renders a UI.
From here, the architecture of your own Electron app may differ in possibly one of these ways:
- You may need your Electron app to access a database or other external service/system
- You may need to leverage one or many of the Node APIs in your app
- You may choose to follow today's common practice and bundle all of your front-end assets in a single Javascript file
- You may need a combination of the above options
If you were not following this guide and instead looking at piecemeal code examples on the internet, it is highly likely that you'd have troubles at this point when writing your first Electron application. Why? Electron is currently on version 16 as of this blog post. A majority of Electron resources online were written before version 5 shipped. In version 5 of the Electron framework, a breaking change was introduced that favored building more secure apps, but this required a fundamental shift of how Electron apps need to be architected. If you are reading an Electron guide, it was likely written before version 5 released, which does not set you up for success with the most current version of the framework.
We will review what this breaking change introduced in version 5 of Electron was, but before we do this - we need to take a dive and understand the internals of Chromium.
Understanding Chromium
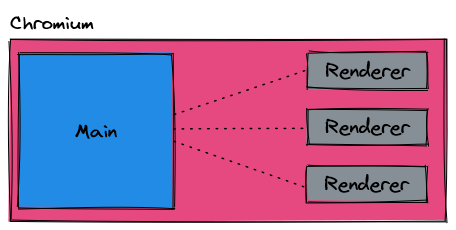
Chromium starts from it's main process. From the main process, renderer processes can be spawned. Renderer processes are synonymous with a [browser] window. The main process holds references to renderer processes and can create/delete renderer processes as necessary. In most Electron apps, only one renderer process is created, but there is no hard limit of 1 if more renderer processes are necessary.
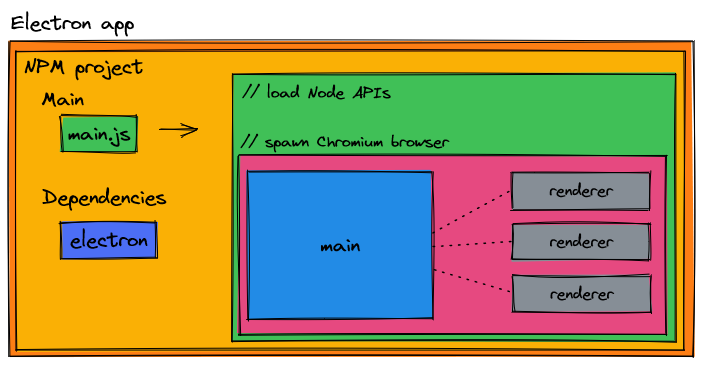
If we inject this diagram into our previous image, this is where Chromium lives in our npm [Electron] project.
Pictures are great for understanding, but when rubber hits the road, we need to know how we can create renderer processes with code. See the below diagram how we can create renderer processes.
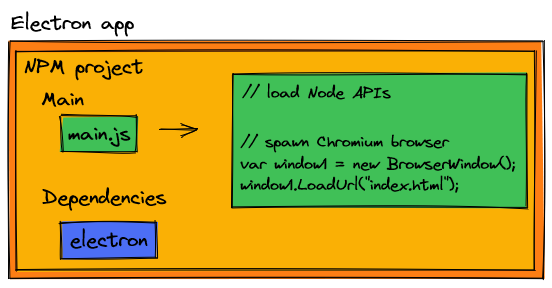
That's it! Chromium exists in our Electron app by managing one to more BrowserWindows. We create a BrowserWindow (or additional as necessary) when our application starts up, and we delete the BrowserWindow (or additional) when the application shuts down. This lifecycle management of BrowserWindows is very easy and handled by Javascript code.
Surprise! If your Electron app is a simple webpage with no connection to external systems (databases, filesystems, etc.) or Node APIs, then not all of the details of Chromium are critically relevant for your Electron app. I do assume that your application does use one of these external libraries/connections, and this adds complexity we need to understand depending on what version of Electron we are targeting.
Pre-version 5 of Electron
As an example, let's assume our Electron application is to replicate a file explorer. Our Electron application should have access to the operating system's file system and be able to create or delete files. Filesystem access and management is handled by the fs Node API. In versions of Electron prior to 5, each renderer process had direct access to Node and could import fs as necessary.
The property that allowed us to include Node in the renderer process is nodeIntegration: true. This made our code easy - our front end Javascript could manage files as we needed and things worked as expected, except when you have someone motivated to attack your systems.
You see, sticking Node in the renderer process opens up our applications to RCE (remote code execution) attacks. Through unique ways, a motivated individual can open up the developer tools on your Electron app (remember, the window is simply a Chromium browser), find the reference to fs, and boom - there goes all of your files.
There are a number of preventative steps one can take to upgrade and patch this vulnerability, but by and large we need to move away from nodeIntegration: true. This is why in version 5 did the Electron team set nodeIntegration to false by default.
Electron version 5+ and [Chromium] IPC
Using our same example as a file explorer, let's explore how we can create or delete files beginning with Electron v5.
We can no longer use Node within the renderer process (since nodeIntegration is false by default), but we still have Node access in our main script, can we leverage that instead?

We can! Instead of interacting with fs in the renderer processes, we instead interact with fs in our main process. In order to do so, we need to introduce IPC (inter-process communication), a detail of Chromium we have not yet covered.
If we simplify our diagram, let's assume we have an individual renderer process; this scenario would be common for Electron applications with a single window. In this example, our main process creates and stores a reference to the renderer process.
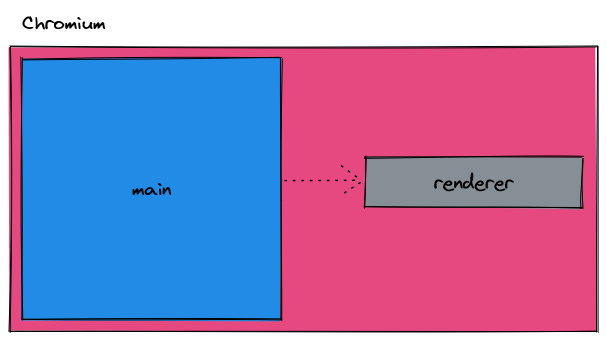
While it may seem like it, neither the main nor the renderer process can talk to each other. The main process only has a reference to the renderer process; the processes are split up due to sandboxing. In order for communication to flow between the main and renderer process, we must use IPC.
IPC stands for inter-process communication and is an event-based driven design. When implementing IPC, each process sets up listener functions that will activate/run when the given message is received.
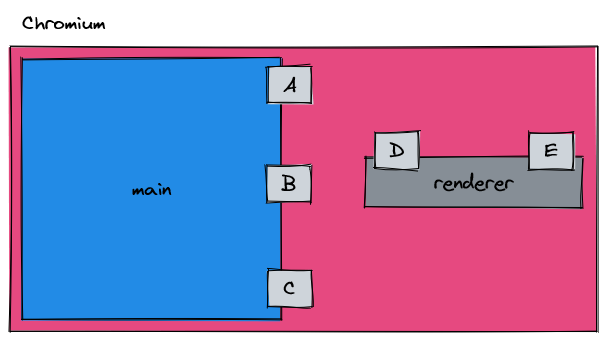
IPC listeners are defined by a name, or "channel". The way in which each process can talk to one another is by sending messages to the others' channel that has a listener defined. Below, you can find a simplified sample of this in practice.
main
const {
  app,
  BrowserWindow,
  ipcMain
} = require("electron");
const path = require("path");

// Keep a global reference of the window object, if you don't, the window will
// be closed automatically when the JavaScript object is garbage collected.
let win;

async function createWindow() {

  // Create the browser window.
  win = new BrowserWindow({
    width: 800,
    height: 600
  });

  // Load app
  win.loadFile(path.join(__dirname, "dist/index.html"));

  // rest of code..
}

app.on("ready", createWindow);

// Create an listener for the event "A"
ipcMain.on("A", (event, args) => {

  // Send result back to renderer process
  win.webContents.send("D", {success: true});
});
renderer
const {
    ipcRenderer
} = require("electron");

window.sendToA = function(){
    ipcRenderer.send("A");
};

window.receiveFromD = function(func){
    ipcRenderer.on("D", (event, ...args) => func(event, ...args));
};
You likely have one or more of these questions:
- How do we
require("electron")in our renderer process? Didn't you say that this isn't allowed any more? - Isn't the renderer supposed to be the window? I don't see any HTML.
- Why are you declaring functions on the
window?
Preload script and security
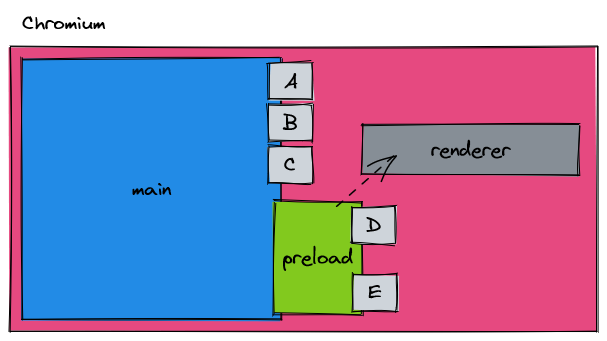
I have purposely glossed over an important detail that's required when communicating over IPC between a main and renderer process, and that's what the Electron team have defined as the preload script.
Since our renderer processes have no access to Node, they themselves can't create the IPC bindings that they need! The answer to this problem is through the preload script, which has access to Node APIs. It is in the preload script that we create our renderer IPC bindings; the contents of the preload script are injected into our renderer process (this is why we are defining functions on the window).
In our code, this is how we define the preload script for our given renderer process.
// Create the browser window.
win = new BrowserWindow({
  width: 800,
  height: 600,
  webPreferences: {
    preload: path.join(__dirname, "preload.js")
  }
});
Unfortunately, there arose a security flaw in the preload design. At any point could someone or some malicious script open up the browser tools of your Electron app and change the definition of a function you've defined in the preload, and then your Electron app may be vulnerable. Let's review a simple example of how this vulnerability might play out and what you should not be doing.
preload
const {
    ipcRenderer
} = require("electron");

window.send = function(){
    return ipcRenderer.send;
};

window.receive = function(){
    return ipcRenderer.on;
};
renderer
<!doctype html>
<html lang="en-US">
<head>
    <meta charset="utf-8"/>
    <title>Title</title>
</head>
<body>
    <script>
        // Called when message received from main process
        window.receive()("fromMain", (data) => {
            console.log(`Received ${data} from main process`);
        });

        // Send a message to the main process
        window.send()("toMain", "some data");
    </script>
</body>
</html>
The above code allows us to arbitrarily send or receive any message to our main process. While having the flexibility saves us development time, a motivated attacker can change the definition of window.receive or window.send and start sending any IPC message they desire to your main process. We run into a problem when your main process looks like this.
main
const {
  app,
  BrowserWindow,
  ipcMain
} = require("electron");
const path = require("path");
const fs = require("fs");

// Keep a global reference of the window object, if you don't, the window will
// be closed automatically when the JavaScript object is garbage collected.
let win;

async function createWindow() {

  // Create the browser window.
  win = new BrowserWindow({
    width: 800,
    height: 600,
    webPreferences: {
      preload: path.join(__dirname, "preload.js") // use a preload script
    }
  });

  // Load app
  win.loadFile(path.join(__dirname, "dist/index.html"));

  // rest of code..
}

app.on("ready", createWindow);

// Create a listener for deleting files
ipcMain.on("deleteFile", (event, args) => {
  fs.unlinkSync(args.filePath);

  // Send the result back to the renderer process
  win.webContents.send("deleteFileResponse", true);
});
If we make the mistake of trusting our renderer processes, and the front-end of our code gets hacked to send a list of file paths to the "deleteFile" channel, we might lose critical files on our computer. This might be a contrived example, but it goes to show if we are not careful, someone might leverage our code to execute actions we had not intended.
In order to use IPC without being vulnerable to function overriding, we need to make use of context isolation. Put simply, context isolation creates an immutable object of what you define in the preload. Anything that has context isolation cannot be changed by the renderer process. Luckily, setting up context isolation is very easy.
// Create the browser window.
win = new BrowserWindow({
  width: 800,
  height: 600,
  webPreferences: {
    contextIsolation: true,
    preload: path.join(__dirname, "preload.js")
  }
});
Our preload needs to change slightly to support context isolation; we need to use the contextBridge.
const {
    ipcRenderer,
    contextBridge
} = require("electron");

// Expose protected methods off of window (ie.
// window.api.sendToA) in order to use ipcRenderer
// without exposing the entire object
contextBridge.exposeInMainWorld("api", {
    sendToA: function(){
        ipcRenderer.send("A");
    },
    receiveFromD: function(func){{
        ipcRenderer.on("D", (event, ...args) => func(event, ...args));
    }
});renderer
<!doctype html>
<html lang="en-US">
<head>
    <meta charset="utf-8"/>
    <title>Title</title>
</head>
<body>
    <script>
        // Called when message received from main process
        window.api.receiveFromD((data) => {
            console.log(`Received ${data} from main process`);
        });

        // Send a message to the main process
        window.api.sendToA();
    </script>
</body>
</html>If we want to take our security to the final step, we can enable sandbox mode. Sandbox mode does what you expect it to, it provides another layer of protection in the case that all of our protections fail, our Electron app won't affect our underlying operating system. Enabling sandbox mode removes all but a very limited number of Node modules. I would recommend creating every new Electron application with sandbox mode as in future versions of Electron, sandbox mode will by default be set to true (this doesn't mean you are forced to use sandbox mode if you don't want to or cannot).
To enable sandbox mode for your Electron app, set the value in webPreferences.
// Create the browser window.
win = new BrowserWindow({
  width: 800,
  height: 600,
  webPreferences: {
    contextIsolation: true,
    sandbox: true,
    preload: path.join(__dirname, "preload.js")
  }
});Many existing Electron packages are not authored in this way, so public package support is somewhat lacking at the time this blog post was written.
Section wrap up
We sure did go through a lot of information, here is what you should remember.
For any Electron application
- Chrome exists in two processes; a main process and one or more renderer process.
For an Electron application that needs to use Node APIs or any other external service/process
- Node APIs should be
requirein the main process. - Communication between the main and renderer process should use IPC.
- The preload must be used to define IPC listener functions for the renderer process, this is done through the
contextBridge. contextIsolationshould be set to true.sandboxshould be set to true [if possible].
Next steps
Take this knowledge you've just learned and apply it and build your first Electron application from scratch.